
Overview
해당 포스트는 Amplify 의 인증 기능 중 Facebook 계정으로 OAuth 기능을 어떻게 구현하는지에 대해 정리해보았습니다. 참고로 Facebook 이나 Google OAuth 같은 경우 코드로 구현하기 보다는 설정하는 것이 어렵고 복잡함으로 혹시 따라하시다가 막히는 부분이 있을 시 댓글로 남겨주시기 바랍니다.
1. Facebook 앱 생성
- Facebook developer 계정을 생성합니다.
- 로그인 후
내 앱을 선택합니다.

앱 만들기를 선택하여 앱을 생성합니다.


- 설정 > 기본 설정에서 해당 App의 앱 ID, 앱 시크릿코드 를 메모장이나 노트패드에 저장합니다.

2. Amplfy Auth 설정
- Flutter Project로 돌아가서 Terminal를 실행하고 명령어를 입력합니다.
amplify update auth
// 만약 기존에 auth 서비스를 생성하지 않았다면 amplify add auth
- 추가로 아래와 같이 설정을 합니다.
you want to use the default authentication and security configuration?
    `Default configuration with Social Provider (Federation)`
? How do you want users to be able to sign in?
    `Username`
? Do you want to configure advanced settings?
    `No, I am done.`
? What domain name prefix you want us to create for you?
    `(default)`
? Enter your redirect signin URI:
    `myapp://`
? Do you want to add another redirect signin URI
    `No`
? Enter your redirect signout URI:
    `myapp://`
? Do you want to add another redirect signout URI
    `No`
? Select the social providers you want to configure for your user pool:
    `<choose your provider and follow the prompts to input the proper tokens>`
중간에 social Provider를 선택을 해야하는데 이때 Facebook를 선택합니다.
그리고 앱 ID와 시크릿 코드를 물어보게 되면 미리 메모장에 저장 한 값을 입력합니다.
- 설정이 완료되었다면
amplify push를 입력하여 Amplify Auth service 를 업데이트 합니다.
3. Facebook 앱 업데이트
- 설정 > 기본 설정에
앱 도메인에 Cognito user pool 도메인 주소를 입력합니다.

https://<your-user-pool-domain>
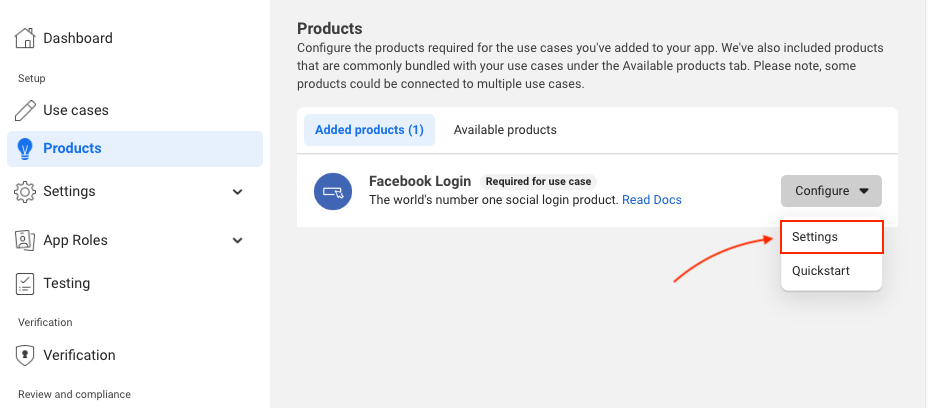
- Dashboard에서
Facebook 로그인의 설정을 클릭합니다.

- 웹을 선택합니다.

- Site Urls 입력창에 아래 형식의 주소를 입력하고 저장을 합니다.
https://<your-user-pool-domain>/oauth2/idpresponse
- Facebook 로그인 > 빠른 설정 에 오게 되면 빨간 경고 창이 뜨고
Get Advanced Access를 선택합니다.

- public profile 를 활성화합니다.

- Dashboard로 돌아가
유효한 OAuth 리디렉션 URI에 아래와 같이 URL를 입력합니다.

https://<your-user-pool-domain>/oauth2/idpresponse
4. Flutter App 설정
안드로이드 설정
android 디렉토리에 AnroidMenifest.xml 에 아래 Activity 정보를 추가합니다.
...
<activity
    android:name="com.amazonaws.mobileconnectors.cognitoauth.activities.CustomTabsRedirectActivity">
    <intent-filter>
        <action android:name="android.intent.action.VIEW" />

        <category android:name="android.intent.category.DEFAULT" />
        <category android:name="android.intent.category.BROWSABLE" />

        <data android:scheme="myapp" />
    </intent-filter>
</activity>
...
iOS 설정
ios 디렉토리의 Info.plist 에 아래 정보를 추가합니다.
<plist version="1.0">

<dict>
<!-- YOUR OTHER PLIST ENTRIES HERE -->

<!-- ADD AN ENTRY TO CFBundleURLTypes for Cognito Auth -->
<!-- IF YOU DO NOT HAVE CFBundleURLTypes, YOU CAN COPY THE WHOLE BLOCK BELOW -->
<key>CFBundleURLTypes</key>
<array>
    <dict>
        <key>CFBundleURLSchemes</key>
        <array>
            <string>myapp</string>
        </array>
    </dict>
</array>

<!-- ... -->
</dict>
5. Flutter 설정
아래와 같은 화면에 OAuth button을 추가하고

만약 사용자가 button을 눌렀을 경우 아래 API를 호출하도록 코드를 추가합니다.
try {
    var res = await Amplify.Auth.signInWithWebUI(provider: AuthProvider.facebook);
} on AmplifyException catch (e) {
    print(e.message);
}
실행화면
총평
이번 시간에는 Amplify와 OAuth provider 중 Facebook 과 연동하는 방법에 대해 알아 보았으며 다음 포스트에는 Google과 연동하는 방법에 대해 알아보도록 하겠습니다.

댓글남기기