Overview
예제 코드를 통해서 CSS의 속성 중 Flexbox 의 동작 방식에 대해 정리한 포스트입니다.
1. Flexbox란?
아래와 같이 Container 에 여러개의 item 을 배치를 개발자가 쉽게 컨트롤할수 있도록 도와준다.

예를 들어 각 아이템의 height 를 동일하게 하거나 각 아이템의 간격을 동일하게 하는 작업을 좀 더 편하게 수행할수 있다.
flexbox 는 크게 두 가지 타입에 대해 적용하게 되는 데

- container : item 을 담고 있는 박스
- item : container 에 포함되어 있는 요소들
container
container에 지정되어 있는 속성은 아래와 같다.

item
item에 지정되어 있는 속성은 아래와 같다.

axis
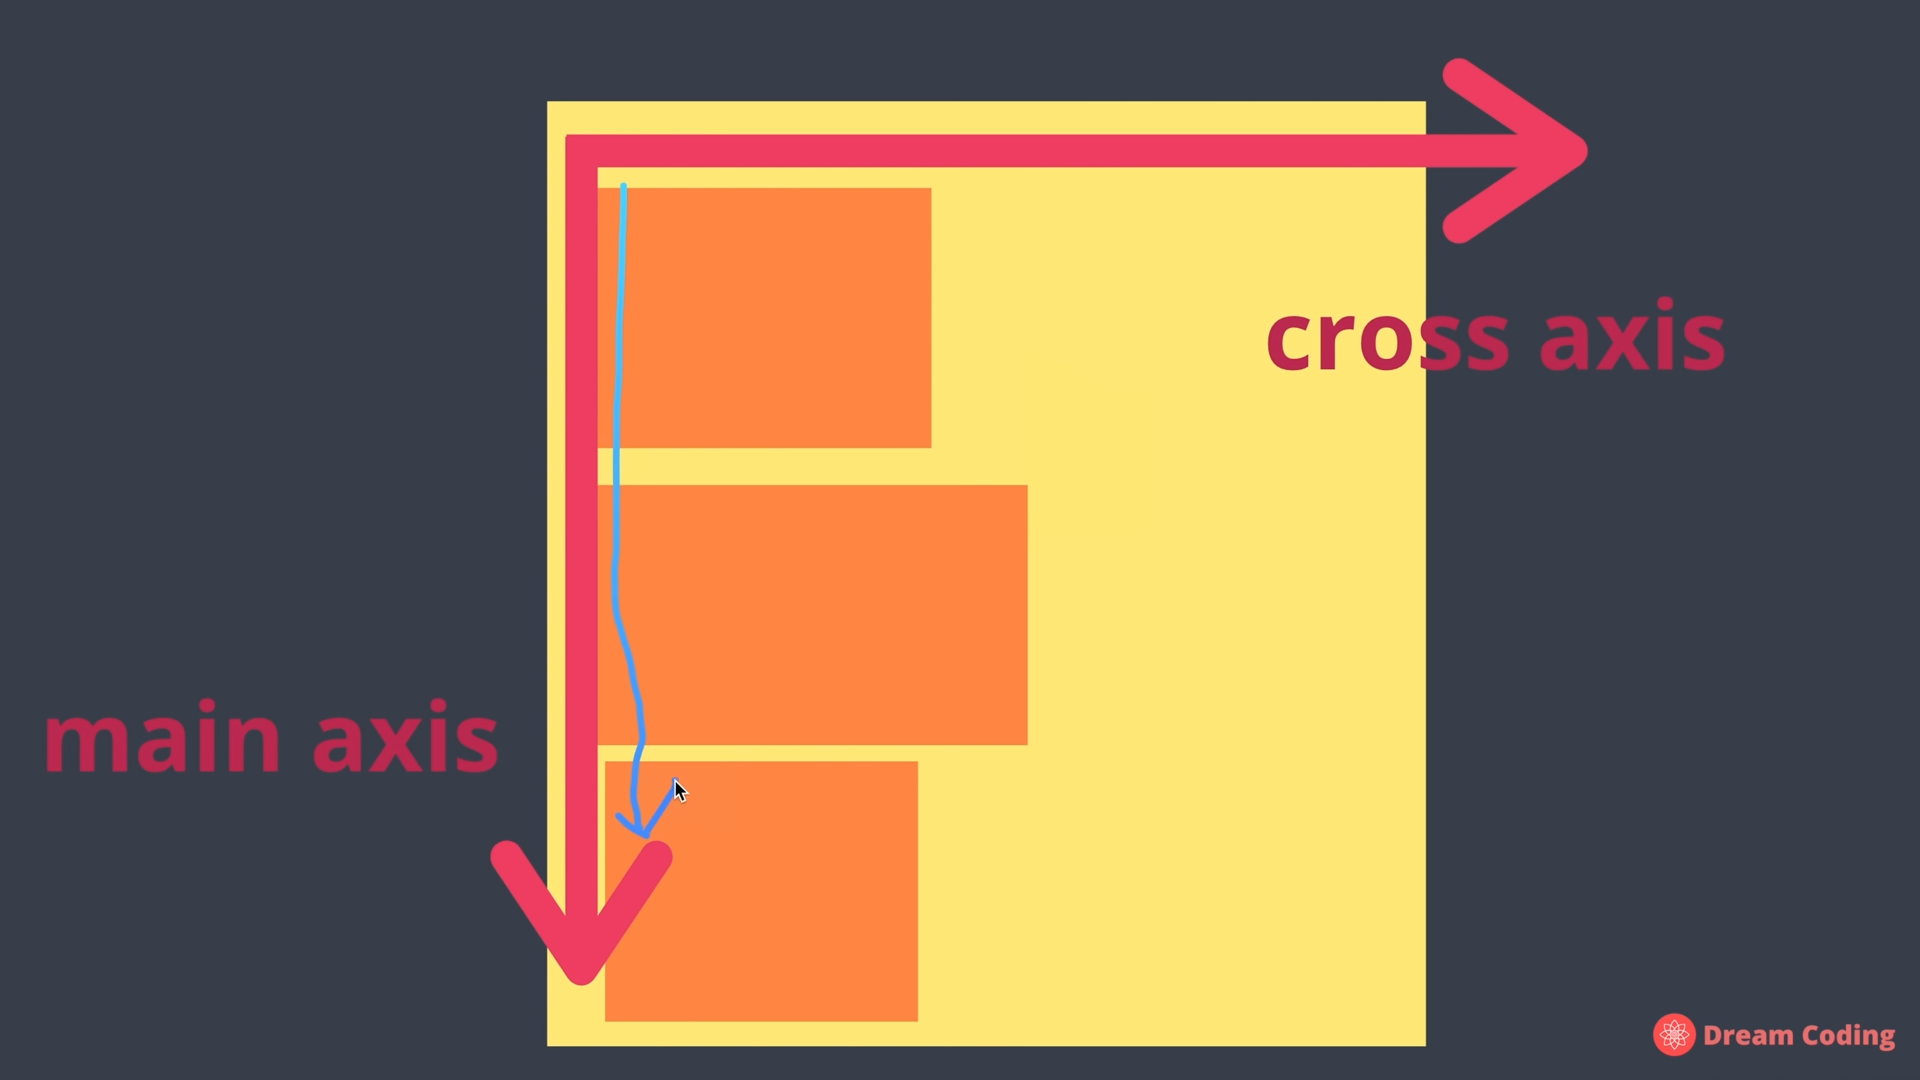
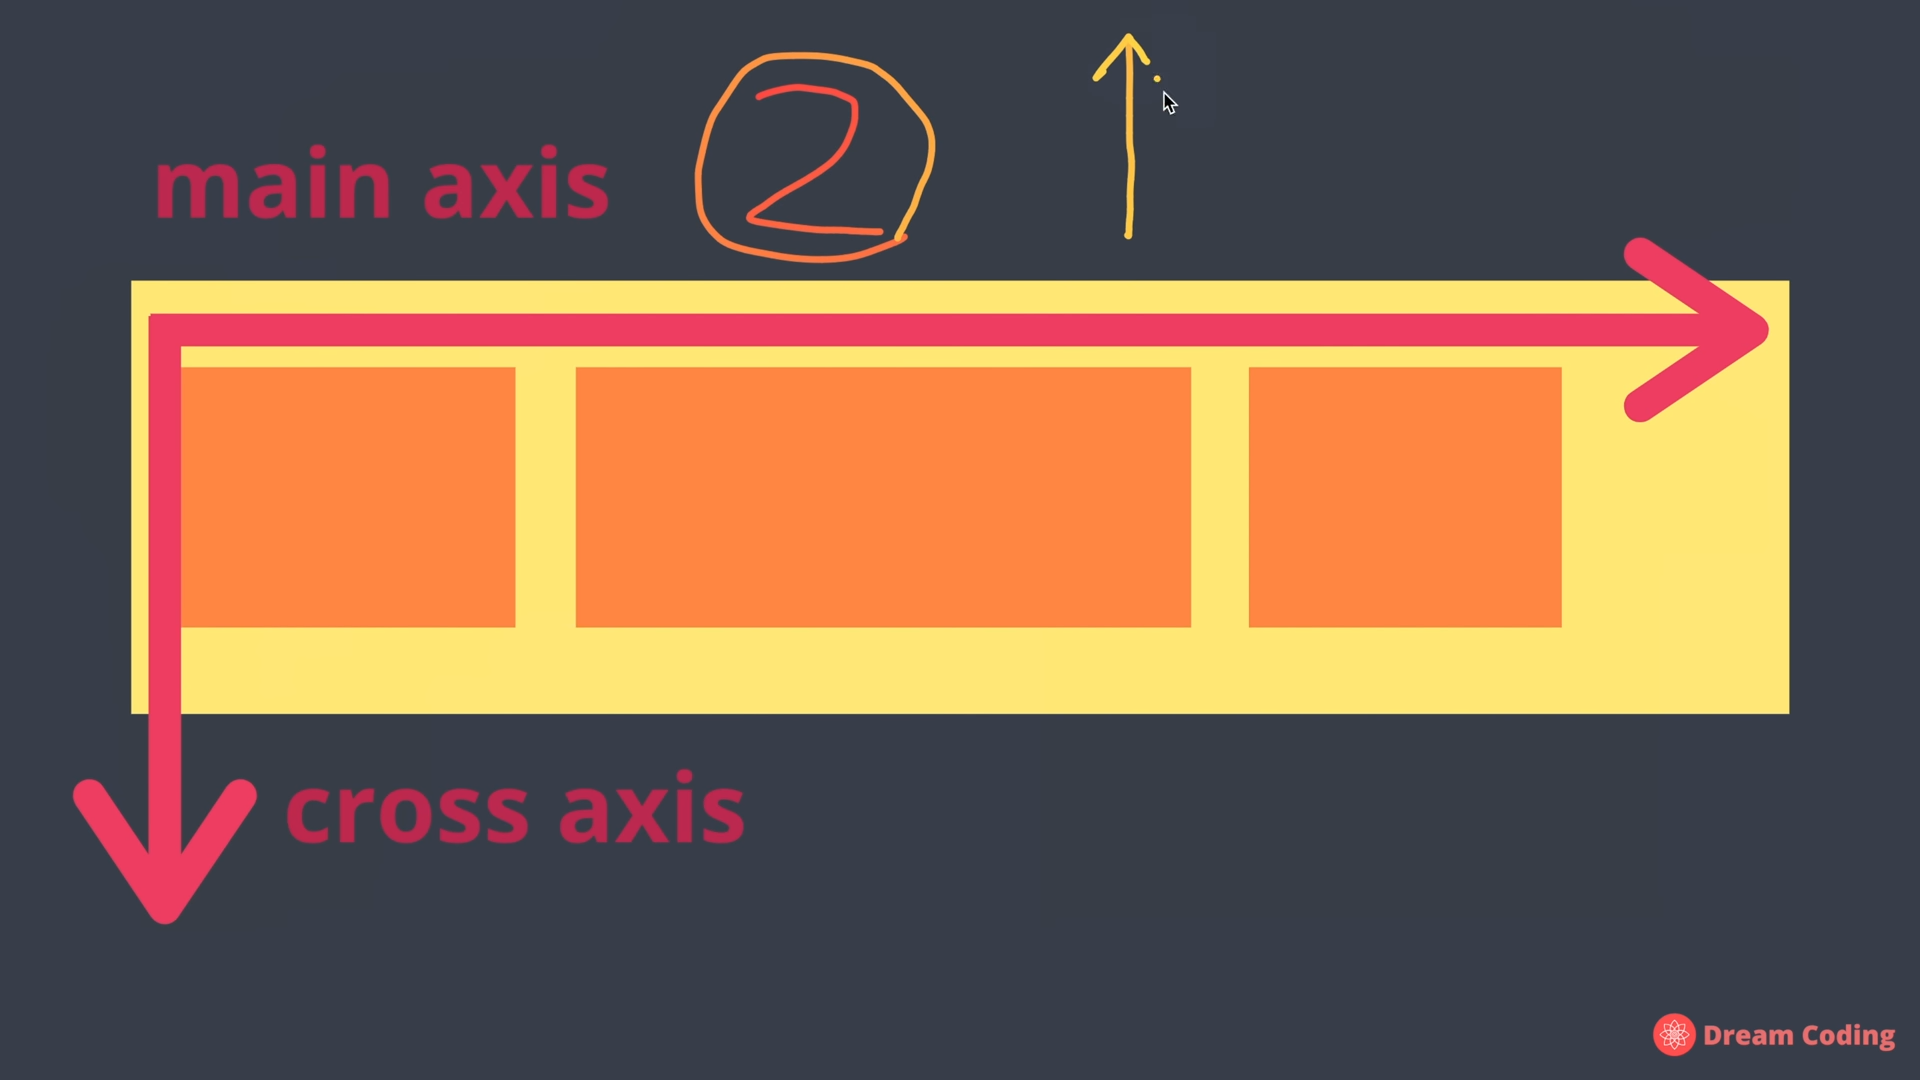
flexbox 는 수평 축, 수직 축을 가지고 있고 둘중 하나를 main axis으로 선택하면 남은 하나는 cross axis 가 된다.


2. container flexbox 속성 적용
아래와 같이 10개의 블록을 선언해보자

위 샘플 코드는 아래와 같다.
HTML
<!DOCTYPE html>
<html>
<head>
  <meta charset="utf-8">
  <meta name="viewport" content="width=device-width">
  <title>JS Bin</title>
</head>
<body>
  <div class="container">
    <div class="item item1">1</div>
    <div class="item item2">2</div>
    <div class="item item3">3</div>
    <div class="item item4">4</div>
    <div class="item item5">5</div>
    <div class="item item6">6</div>
    <div class="item item7">7</div>
    <div class="item item8">8</div>
    <div class="item item9">9</div>
    <div class="item item10">10</div>
  </div>
</body>
</html>
CSS
.container {
  background : beige;
  height :100vh;
}

.item {
  width : 40px;
  height :40px;
}

.item1 {
  background : #e57373;
}

.item2 {
  background : #f06292;
}

.item3 {
  background : #ba68c8;
}

.item4 {
  background : #9575cd;
}

.item5 {
  background : #7986cb;
}

.item6 {
  background : #64b5f6;
}

.item7 {
  background : #4fc3f7;
}

.item8 {
  background : #4dd0e1;
}

.item9 {
  background : #4db6ac;
}

.item10 {
  background : #81c784;
}
container 를 flexbox 로 적용하기 위해서 display:flex 를 추가하면 아래와 같이 블록이 정렬이 되는 것을 확인할 수 있다.

2.1. flex-direction
블록의 방향을 변경할 때 사용하며 기본 값은 row 이다.
.container {
  background : beige;
  height : 100vh;
  display :flex;
  flex-direction: row;
}
그 외 값은 아래와 같다.
| row | row-reverse |
|---|---|
 |
 |
| column | column-reverse |
|---|---|
 |
 |
2.2. flex-wrap
한 줄에 아이템이 너무 많을 경우 아이템을 다른 줄로 줄 바꿈을 할지 아님 아이템 사이즈를 축소시켜서 한 줄에 표시할지를 결정한다.
{
  ...
  flex-wrap : nowrap; // or `wrap`
}
기본 값은 nowrap 이며 nowrap 일 경우 아래와 같이 item 을 감싸는 container 가 작아져도 무조건 한줄로 표시됨을 볼 수있다.

flex-wrap 값을 wrap 으로 지정한 경우 아래와 같이 container 가 작아지면 자동으로 줄 바꿈을 하는 것을 볼수 있다.

2.3. justify-content
중심 축 기준으로 item 을 어떻게 배치할지 결정한다.
{
    justify-content : start // or end, space-around, ...
}
start
디폴트 값으로 중심 축이 수평 방향이면 item 을 왼 쪽에 그리고 수직 방향이면 item 을 위 쪽에 배치를 한다.
end
중심 축이 수평 방향이면 아이템을 오른 쪽 에 그리고 수직 방향이면 아이템을 아래 쪽에 배치를 한다.
center
item 을 중앙으로 배치한다.

space-around
중심 축이 수평 방향이면 아이템 좌 우에 동일한 크기의 space 가 추가된다. 그리고 수직 방향이면 위, 아래에 동일한 크기의 space 가 추가된다.

space-between
item 과 item 사이의 space 의 사이즈는 모두 동일하고 item 과 container 의 space 사이즈는 0가 된다.

space-evenly
item 과 item 사이 그리고 item 과 container 의 space 사이즈는 모두 동일하다.

2.4. align-content
반대 축의 item 을 어떻게 배치할지 결정
| center | space-around | space-between |
|---|---|---|
 |
 |
 |
{
    align-content : start // or end, space-around, ...
}
3. item flexbox 속성 적용
다음은 item 에 대해서 적용되는 여러 flexbox 의 속성을 알아보자 먼저 아래와 같이 container 애 item 이 있다고 가정할 때
Output

HTML
<!DOCTYPE html>
<html>
<head>
  <meta charset="utf-8">
  <meta name="viewport" content="width=device-width">
  <title>JS Bin</title>
</head>
<body>
  <div class="container">
    <div class="item item1">1</div>
    <div class="item item2">2</div>
    <div class="item item3">3</div>
  </div>
</body>
</html>
CSS
.container {
  background : beige;
  height :100vh;
  display : flex;
}

.item {
  width : 40px;
  height :40px;
  border : 1px solid black;
}

.item1 {
  background : #e57373;
}

.item2 {
  background : #f06292;
}

.item3 {
  background : #ba68c8;
}
3.1. flex-grow
item 이 container 에 여유 공간이 있으면 사이즈를 차지하려고 할 때 사용되는 값이다.
{
  flex-grow : 1 // defalt : 0
}
item1 의 flex-grow 를 1로 지정하게 되면 아래와 같이 item1 이 남은 공간을 모두 차지하는 것을 볼수 있다.

그리고 모든 item 들에 대해서 flex-grow 를 1로 지정하게 되면 아래와 같이 모든 item 들이 동일한 크기로 남은 공간을 차지하게 된다.

위 상태에서 item1 flex-grow 를 2로 변경하게 되면 item1은 item2, item3 의 두 배의 사이즈를 차지하게 된다.

3.1. flex-shrink
container 에 여유 공간이 없을 때 item 의 사이즈를 결정하는 속성이다. flex-grow 의 반대 속성이다.
아래 화면은 item1의 flex-shrink 값을 2로 하고 나머지는 flex-shrink 를 1로 했을 때 어떻게 동작하는 지 보여준다.

3.2. flex-basis
container 의 사이즈가 늘어나거나 줄어들때 동일한 비율을 유지할 때 사용되는 속성이다.
{
   flex-basis : 10% // default : auto, 0%~100%
}
각 item 의 속성을 아래와 같이 지정했을 때
.item1 {
  background : #e57373;
  flex-basis : 70%
}

.item2 {
  background : #f06292;
  flex-basis : 20%
}

.item3 {
  background : #ba68c8;
  flex-basis : 10%
}
결과 화면이 아래와 같이 출력되는 것을 볼수 있다.

3.3. align-self
하나의 item에 대해 위치를 변경하고 싶을 때 사용한다.
.item {
    align-self : center // start ,end ...
}
item1 의 align-self 값을 center 로 변경하게 item1이 container 중앙에 배치되는 것을 볼수 있다.

4. 참고 자료
4.1. Guide to Flexbox
좀 더 자세한 flexbox 정보는 아래 사이트 참고
4.2. FLEXBOX FROGGY
flexbox 를 학습하기 위한 game 형식 사이트


댓글남기기